Make Your Own Pull Tab Invitations

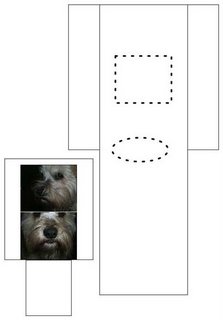
"The peek-a-boo picture holder has two parts, the sleeve (the flat tube with a window) and the slider (the strip with the images on it that you pull through the tube). Cindy’s design uses red card stock for the slider and has details about the wedding (it is an invitation, after all), and the slider has black and white images captured from a photo-booth (how very Amélie), and also has some details about the wedding on the pull tab.
In my version, the top remains open, so you can insert different sliders if you want. If you do want to make these for wedding invitations, you will want to have a die cut.
Here is my homage to Cindy’s clever design.
Tools:
* computer
* image editing software (such as Adobe Photoshop, Photoshop Elements…)
* matt knife, straight edge, cutting surface
* glue stick
Ingredients
* card-stock (if you want to follow Cindy’s design, use colored stock for the sleeve)
* digital images
Make it:
1. Download the template I made for you.(click here to find their page with the downloadable temple)
2. Using your image editing software, remove the fill on the slider where the pictures go. If you select each square and then use the background eraser, it goes very fast.
3. Create a new layer behind the layer with the template, and move your images to that layer. Please note: to save space on the template, the slider is upside down. You will need to rotate your images for the slider.
4. Move your images to the new layer, and position them so they peek though — you may have to size them a bit to have a happy fit.
5. Print out the file, cut out the pieces, cut out the window and the slot for the pull-tab on the sleeve.
6. Insert the pull-tab of the slider into the slot so that you see your images in the sleeve window.
7. Fold the back of the sleeve over the back of the slider, and then glue down the side flaps."
link- Readymade


0 comments:
Post a Comment